By Janne Lahtela
In our previous blog posts, we have familiarized ourselves with how to get started in the development of a Smart TV application and how to handle navigation. This time we will look at how to get started with video playback. There are several video player solutions, some commercial and some open source. I recommend checking out, e.g., Dash.js, BitMovin, JWPlayer, Theo, NexPlayer and ExoPlayer. Also, one option is to use the Smart TV’s native video player. Naturally, each video player has its own pros and cons, like how the player supports multiple audio tracks, subtitles, etc.
My colleague Teemu presented in an earlier blog how to implement pointer events for LG Smart TV, so let’s continue with LG in this blog. We will use Shaka Player to play the video in this example because the documentation is easily available and works on several Smart TV platforms. We will be using a non-DRM-protected video stream, making the video playback implementation a little bit easier. Furthermore, we will not be implementing any player user interface elements or navigation.
Picture 1
Let’s get started!
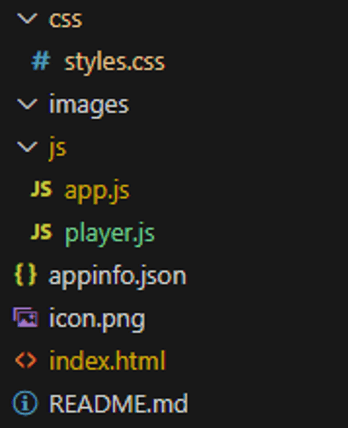
Since our project is growing, let’s rearrange the files a bit, as shown in the picture 1. Style files to the css directory, images to the images directory and JavaScript files to the js directory.
The appinfo.json file contains app data for LG Smart TV, and icon.png is what is displayed in the Smart TV app bar.
It is good to document what has been done which is why README.md is there.
This time we use Shaka Player from a CDN. An alternative is, for example, an NPM package.
<script src="https://cdnjs.cloudflare.com/ajax/libs/shaka-player/4.5.0/shaka-player.compiled.js"></script>
Also, because we changed the JavaScript files directory, we must change the file paths. The video player also needs its own element in the index.html file, which should look like this:
					<!DOCTYPE html>
<html>
    <head>
        <meta charset="UTF-8">
        <title>My Awesome Smart-TV -app!</title>
        <link rel="stylesheet" type="text/css" href="./css/styles.css" />
        <script src="https://cdnjs.cloudflare.com/ajax/libs/shaka-player/4.5.0/shaka-player.compiled.js"</script>
        <script type="text/javascript" language="javascript">
            document.addEventListener("DOMContentLoaded", function(event) {
                createApp();
            });
        </script>
        <script src="./js/player.js"></script>
        <script src="./js/app.js"></script>
    </head>
    <body>
        <div id="app"></div>
        <video id="video" autoplay></video>
    </body>
</html>
As you can see in Picture 1, we also have the player.js file in the js directory. The Shaka Player code goes into that file, allowing us to keep the application’s functionality separate from the video player. In this example, I follow the code presented in Shaka Player’s documentation as closely as possible. This way, it will hopefully be easier to find information about what is happening in the video player.
					async function init(url) {

  // Create a Player instance.
  const video = document.getElementById('video');
  video.style.display = "block";
  const player = new shaka.Player(video);

  window.video = video;

  // Attach player to the window to make it easy to access in the JS console.
  window.player = player;

  // Listen for error events.
  player.addEventListener('error', onErrorEvent);

  // Try to load a manifest.
  // This is an asynchronous process.
  try {
    await player.load(url);
    // This runs if the asynchronous load is successful.
    console.log('The video has now been loaded!');
  } catch (e) {
    // onError is executed if the asynchronous load fails.
    onError(e);
  }
}

function onErrorEvent(event) {
  // Extract the shaka.util.Error object from the event.
  onError(event.detail);
}

function onError(error) {
  // Log the error.
  console.error('Error code', error.code, 'object', error);
  video.style.display = "none";
  document.getElementById("app").style.display = "block";
}

function videoPlayerShaka(url) {
  console.log('videoPlayerShaka contructor')
  shaka.polyfill.installAll();

  // Check to see if the browser supports the basic APIs Shaka needs.
  if (shaka.Player.isBrowserSupported()) {
    // Everything looks good!
    init(url)
  } else {
    // This browser does not have the minimum set of APIs we need.
    console.error('Browser not supported!');
  }
 }
Now we are starting to have everything in place so that we can get to work with our own code. Time to start working on the app.js file.
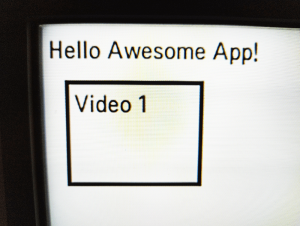
Let’s create a small object so we can mimic an API where we get asset data in real life. This object creates our carousel which in this case is just one item.
					/**
 * Dummy data
 */
const carouselItems = [
  {
      id: "video-0",
      title: "Video 1",
      type: "video",
      url: 'https://storage.googleapis.com/shaka-demo-assets/angel-one/dash.mpd'
  },
]
The id is for the HTML element, title is what is displayed in the HTML Element, type is just for fun right now and url is a manifest URL which we use to play a video stream.
Right, the next thing we do is create a carousel from the object we created!
					/**
 * Creates carousel items to the page
 * @param {object} items
 */
function createCarousel(items) {
  const carousel = document.createElement('div');
  carousel.setAttribute("class", "carousel");
  for(let i = 0; i < items.length; i++) {
    const item = items[i]
    /**
     * Creates DOM Element item
     */
    const Ditem = document.createElement('div');
    Ditem.setAttribute("id", item.id);
    Ditem.setAttribute("class", "item"+(i == 0 ? " focus" : ""));
    Ditem.innerHTML = item.title;
    carousel.appendChild(Ditem);
  }
  root.appendChild(carousel)
}
Then, we need something to handle navigation between carousel items and selecting an item when ENTER is pressed.
					/**
 * Getter for focused html element
 * @returns {html element} focused element
 */
function getFocus() {
  return document.getElementsByClassName("focus")[0].id;
}

/**
 * Setter for focus
 * @param {string} id
 */
function setFocus(id) {
  if(id === null) return;
  const currentFocus = document.getElementById(getFocus());
  currentFocus.classList.remove("focus");
  document.getElementById(id).classList.add("focus");
}

/**
 * The key press functions
 */
function keyPressUp(focusedId) {
  console.log("You pressed the up key", focusedId);
}

function keyPressDown(focusedId) {
  console.log("You pressed the down key", focusedId);
}

function keyPressLeft(focusedId) {
  console.log("You pressed the left key", focusedId);
  const previous = getPreviousElementId(focusedId);
  if(previous === null) return;
  setFocus(previous);
}

function keyPressRight(focusedId) {
  console.log("You pressed the right key", focusedId);
  const next = getNextElementId(focusedId);
  if(next === null) return;
  setFocus(next);
}

/**
 * Selects item when enter is pressed
 * @param {string} focusedId
 */
function selectItem(focusedId) {
  console.log("You pressed the enter key", focusedId);
  for(let i = 0; i < carouselItems.length; i++) {
    if(focusedId === carouselItems[i].id) {
      playVideo(carouselItems[i].url);
      break;
    }
  }
}

/**
 * Getter for the next html element
 * @param {string} id
 * @returns {html element}
 */
function getNextElementId(id) {
  const next = document.getElementById(id).nextElementSibling;
  return next!== null && next.id !== undefined ? next.id : null;
}

/**
 * Getter for the previous html element
 * @param {string} id
 * @returns
 */
function getPreviousElementId(id) {
  const previous = document.getElementById(id).previousElementSibling;
  return previous !== null && previous.id !== undefined ? previous.id : null;
}
Now we need something to handle starting and stopping the video player.
					/**
 * Creates and starts video player
 * @param {string} url
 */
async function playVideo(url) {
  root.style.display = "none";
  videoPlayer = new videoPlayerShaka(url)
}

/**
 * Stops and destroys
 */
function stopVideo() {
  if(videoPlayer !== null) {
    video.pause();
    video.style.display = "none";
    video.currentTime = 0;
    window.video = null;
    player.unload();
    player.destroy();
    videoPlayer = null;
    root.style.display = "block";

  }
}
Next, let’s make a small improvement to our remote control keys so we can test this on the PC browser: let’s add KB_BACK to the key variables.
					/**
 * A remote control key variables
 */
let RC_LEFT,RC_UP,RC_RIGHT,RC_DOWN,RC_ENTER,RC_BACK,RC_EXIT, KB_BACK;
And introduce it in the registerKeys method:
					/**
   * Keyboard events for testing
   */
  KB_BACK = 226;
And add it to the handleKeyPress method:
					    case KB_BACK:
    case RC_BACK:
      stopVideo();
      break;
What we still lack are video player user interface elements such as fast forward, rewind and pause. So, it is good to continue learning about Smart TV application development.
In this blog, we have covered the very basics. When you start implementing a real Smart TV application, you must consider various things, such as which platforms the video player must work on, what limitations each player has and how well support is available for the player. There may even be a situation where you must choose several video players, which naturally increases the amount of work and testing required. I recommend checking out our Smart TV testing methods and devices.
ABOUT AUTHOR
 I’m currently working at Sofia Digital Ltd as a Scrum Master and software developer. I’ve three years of experience in Smart TV application development and over 20 in web development including front- and back-end (full-stack).
Read also
- Pointer events for smart TV applications
- How to handle remote control keys in a Smart TV application
- How to build your first Smart TV-application?
- Designing Multiplatform Smart TV Applications
- Designing Multiplatform Smart TV Applications part 2: Problems & Solutions
- How to successfully design user interfaces for Smart TV apps
- Application testing – Will your app work on the latest Smart TVs?